Wednesday, May 13, 2015

TrialWorks Tip of the Week


Last week we learned where to keep Important Dates in TrialWorks. Now, it’s time to remember them by adding them to Outlook. Here are a few ways how:


Click on the ‘Docket’ tab to access the Important Dates button.


Along the bottom toolbar, click ‘Date Info’


All entries can be added at once by clicking the ‘Send All Entries to Calendar’ button


To add just one deadline to the TrialWorks Docket, Outlook Task or Calendar, right click on the specific date and select to ‘Send Date to’ the appropriate source.


Once a docket or calendar item pops up, the invitation can be modified. Please note, any invitees in the case will be automatically invited.


Reports are a great way to see Important Dates for all cases.  To see a Trial Calendar for a selected date range, click on the ‘Reports’ tab from the Home Ribbon and select ‘Trial’


Have you missed any of TrialWorks previous Tip of the Week or blog posts? Head back to http://trialworks.blogspot.com/ and check them out!

Thursday, May 07, 2015

TrialWorks Tip of the Week


Wouldn’t it be convenient to take your Scheduling Order and enter all important dates at ONCE?

Use the Important Dates button on the toolbar of the Docket TAB. 

Head to the ‘Docket’ tab to access the Important Dates feature.
                               

Along the bottom bar, click ‘Date Info’
                                             

Enter one date, or multiple dates. Create docket items, Outlook calendar entries or print a report.


Check back next week as we dive further into 'Important Dates,' and learn how to docket the entries and add them to your Outlook calendar! For previous Blog and Tip of the Week posts from TrialWorks, head over to http://trialworks.blogspot.com/

Friday, May 01, 2015

Generating Contact Lists


In the business world, an effective way to manage your contacts is essential. Your system should be quick, simple, and modifiable. Did you know there are many different ways you can sort, create and view a contact list within TrialWorks?

Head to the Reports section of the ribbon and select the Contacts dropdown.

 Choose from the following options:


To learn the step-by-step process to generating a client list by current case and dive deeper into exporting and modifying your created contact lists, check the TrialWorks blog post on Monday!

Wednesday, April 22, 2015

ADDING A 'QUICK NOTE' TO A CASE


 To add a ‘Quick Note’ to a case, first click on the ‘Case/Retainer Info’ tab


Once you are at the ‘Case/Retainer Info’ tab, click on the “Extra info” button - along the bottom toolbar.


The ‘Extra Info’ window is where you would type in your ‘Quick Note’


Close the door and your note is automatically saved. Each time you now go in to that case, a pop-up box will appear with your ‘Quick Note.’ Think of the Quick Note feature as a virtual Post-it® note.


TrialWorks Tip of the Week: Utilizing 'Quick Note'


Always be reminded by creating a ‘Quick Note’ in a case.


Different from the case notes, a ‘Quick Note’ acts as a pop-up each time you select a case. You can use the ‘Quick Note’ feature as a virtual post-it note. ‘Quick Notes’ can be modified as many times as needed and each individual case has the option to add their own.

To learn how to add a ‘Quick Note’ to a case, check out the TrialWorks blog entry at http://trialworks.blogspot.com/

Wednesday, April 15, 2015

Modifying A Canned Report


The TrialWorks Closing Statement report is a perfect example of a report that would need to be modified before presenting it to a client.  To run this report, click on the ‘Current Case’ tab on the HOME ribbon. Then “Closing Statement”. Multiple closing statement report options are available. Select the appropriate report, and click “OK” to allow the report to settlement information from the settlement calculator.


Once the report has generated, the print preview menu allows for various options to edit and print.


Custom Sort: The custom sort, limit to category and filter features are available depending which report is run. For the Closing Statement Report, there is no need to filer based on internal firm criteria. Case list or Docket report, have the option to filter or sort by date, liability or Attorney/Support.

 Print: Select the number of copies and print.


  Email: Generate and send an email of the report using Excel, HTML format, or PDF formats.


 PDF or XPS: Save and/or print to PDF or XPS formats. PHOTO 7 & PHOTO 8
Word: Save in Microsoft Word format.
Text File: Save a text file, which will convert the report into plain text.


 Size: Change the size of the report by using standard Microsoft Office sizing charts. Modify to a letter sized 8 ½ x 11 to a legal size, 8 ½ x 14.


 Margins: Customize report margins to normal, wide, narrow, or customize to a user’s liking.


Setup: Print the report in portrait or landscape mode. The ‘Print Data Only’ checkbox will format without any excess lines and dots, printing only the necessary text and numbers in the report.


 Page Setup Button: Edit size, margins, page orientation, and  columns.


Zoom: Zoom in and out to preview the report before printing.


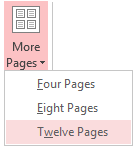
Pages: View report over one page, two pages, four, eight or twelve pages.


Close Print Preview: Close the preview to return to TrialWorks.

TrialWorks Tip of the Week!

Wish it were possible to change one of the many TrialWorks reports? As shown below, almost every report in TrialWorks can be filtered, sorted or modified.

TrialWorks ships with over 150 different types of reports. Visit the “REPORTS” menu  off the Home Ribbon to select a report to use. Each report can be modified using Microsoft Word or Excel. Filter and sort the reports, print or save them, or email them straight from TrialWorks.
For a complete list of available TrialWorks Reports, click here. To dive deeper and learn more about the specific modifications that can be made to TrialWorks  reports, check out the TrialWorks blog entry this week at http://trialworks.blogspot.com/

Tuesday, April 07, 2015

Case Summary


OVERVIEW & REPORT

The Case Summary tab is your non-editable, one stop shop to learn anything and everything about a specific case. Quickly view the case’s file number, relevant parties, where the case originated from, attorneys and support on file, the Judge and what court the case is in. Learn the detailed case facts, and any negotiations made in the case.


In the Case Summary tab you can view any other parties assigned to the case as well as who their attorney is. Easily find insurance information such as policy numbers, claim numbers and adjuster contact info. You can also see the current status of the case; how far along the investigation is going, how many days they’ve been open, and when they are set to expire. Lastly, as shown as the Tip of the Week, along the bottom is the case summary bar’s location. Here is where the time, date and which employee made the last modification is found.


RUNNING THE CASE SUMMARY REPORT

Select Reports → click Case → hover over Overview


Scroll to Case Summary Report and click


You will be prompted and have the option to include any case notes. 


Your report will generate into a print preview and ultimately look like the below report.


Ever wonder if this, or any other canned report can be modified? Check back next week for another installment of our blog and Tip of the Week by TrialWorks.

Have a suggestion or topic you’d like to see featured? Let us know! Email scheduling@trialworks.com with the subject line: ‘Tip of the Week!’

Wednesday, April 01, 2015

HOW TO SWITCH BETWEEN CASES AND HOW TO SEARCH FOR CASES


1. To find a case quickly in your TrialWorks, click on the Case Name and start typing the name of the matter.


2. If you are unsure, you can always click the drop down arrow and scroll through.


3. Or, if you are unsure, you can always click the drop down arrow and scroll through.


Click the radio button that corresponds to the information you are searching for. Type that data in the search text box and click search.


A list of cases that match search criteria will be provided. This is a great way to quickly determine who to pass a call in the office to, the cases status, or see which atty/support is assigned to a case. To access that case, just double click on the case name